
How to Type in Thai: Thai Keyboard Setup for Any Device
Add a Thai keyboard on iPhone, Android, Windows and Mac, then learn how the Kedmanee layout works and the order to type vowels and tone marks.
You can read some Thai now — menus, signs, maybe short messages. Then a Thai friend texts you, and you realize reading and producing are different skills: you’ve never typed a single character. The fix takes one minute of settings and one honest hour of practice. This guide covers adding a Thai keyboard to every device you own — iPhone, Android, Windows, Mac — and then the part nobody explains: how the Thai keyboard layout actually works, and the typing order for vowels and tone marks that stack above and below the line.
If you can’t read Thai script at all yet, start with our guide to how the Thai writing system works first. Typing in Thai assumes you can recognize what you’re producing — the keyboard shows you characters, not romanization.
What a Thai Keyboard Actually Looks Like
First, the question behind a lot of searches: a Thai keyboard isn’t a separate physical device. In Thailand, keyboards are dual-printed — English letters and Thai characters share each key — and the operating system decides which language a keystroke produces. Your existing keyboard becomes a Thai one the moment you enable Thai input.
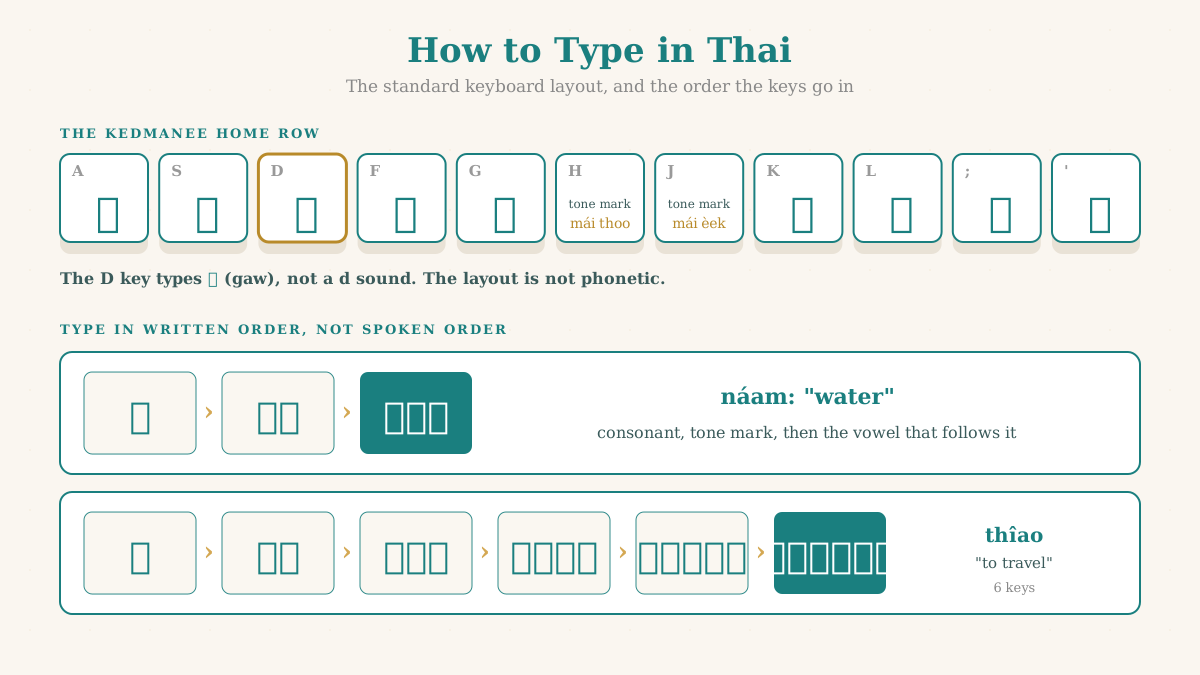
The standard layout is called Kedmanee (เกษมณี(gèet-má-nii)). It descends from the Thai typewriters of the 1920s, takes its name from the man usually credited with designing it, and became Thailand’s national standard in 1988 (TIS 820-2531, updated in 1995 as TIS 820-2538). Here’s the thing that surprises everyone: it’s not phonetic. Pressing the key marked “D” doesn’t give you a Thai “d” sound — it gives you ก(gaw). The arrangement was inherited from those typewriters, so a key bears no relation to the English letter printed on it. The left home row reads ฟ ห ก ด(faw hǎw gaw daw) where an English keyboard has A-S-D-F.
The board has two layers, and you need both:
- Unshifted keys hold most of the consonants, the common vowel marks, and the two most-used tone marks (่(mái èek) and ้(mái thoo)), which sit right on the home row under your right hand
- The shift layer holds the rest — less common consonants like ฌ(chaw choe), the Thai numerals ๑ ๒ ๓(nèung sǎwng sǎam), and the baht sign ฿
- The number row doesn’t type numbers — most of its keys type Thai letters, because Thai needs more letter keys than English does. For Arabic digits, use the numeric keypad or switch back to English input
With 44 consonants, more than twenty vowel and tone marks, and only about 47 physical keys, the shift layer isn’t optional — it’s how the whole alphabet fits. The layout also tells you nothing about how a letter behaves: which consonant class each letter belongs to is something you learn from reading, not from where the key sits.
See the layout without Thai keycaps
If your keys only show English letters, put the Thai layout on screen while you learn it:
- Windows 11: open Settings → Accessibility → Keyboard and turn on On-Screen Keyboard. With Thai input active, it shows the Thai character on every key.
- macOS: click the input menu in the menu bar and choose Show Keyboard Viewer. Hold Shift to see the second layer.
Add a Thai Keyboard on Your Phone
iPhone (iOS)
- Open Settings → General → Keyboard → Keyboards
- Tap Add New Keyboard…
- Choose Thai from the list
While typing, tap the globe key to cycle keyboards, or hold it to pick from a menu. iOS’s on-screen Thai keyboard follows Kedmanee’s arrangement, compressed to fit. If you connect a hardware keyboard, tap Thai in the Keyboards list to choose the layout it uses.
iPad: the steps are the same — Settings → General → Keyboard → Keyboards. With an external keyboard attached, hold Control and press Space to move between your keyboards.
Android
On Gboard (the default on Pixels and most others):
- Open any app that brings up the keyboard, tap the settings gear on Gboard (or go to Settings → System → Keyboard → On-screen keyboard → Gboard)
- Tap Languages → Add keyboard
- Choose Thai, pick the layout, tap Done
To switch between English and Thai on Gboard, touch and hold the space bar and pick the language. If you’d rather have a dedicated globe key, turn on Show language switch key in Gboard’s Preferences.
On Samsung Keyboard, add Thai in Samsung Keyboard’s language settings — the menu names differ between One UI versions, so look for the list of input languages — and switch languages from the keyboard once Thai is enabled.
Add a Thai Keyboard on Your Computer
Windows 11
- Open Settings → Time & Language → Language & region
- Click Add a language, search for Thai, and click Next
- Skip the optional language features — you only need them if you want Windows menus in Thai — and click Install
Switch languages with Win + Space or the language indicator in the taskbar. Windows gives you the Kedmanee layout by default, with Pattachote available as an alternate keyboard under the Thai language options.
Mac (macOS)
- Open System Settings → Keyboard
- Under Text Input, click Edit next to Input Sources
- Click +, find Thai, and click Add
macOS offers both Thai (Kedmanee) and Thai – PattaChote. Take the plain Thai option unless you have a reason not to. Keep “Show input menu in menu bar” on so you can see and switch your active language at a glance, or press Control + Space to jump back to the last input source you used. The globe/fn key switches too, but only after you set Press Globe key to (or Press fn key to) → Change Input Source in Keyboard settings.
Chromebook (ChromeOS)
Open Settings → Device → Keyboard → Change input settings, and under Input methods add Thai. Press Ctrl + Shift + Space to move between input methods.
How Typing in Thai Actually Works
Enabling the keyboard is the easy part. Typing in Thai has three rules English didn’t prepare you for.
Rule 1: Type in visual order, not spoken order
Thai vowels can appear before, after, above, or below their consonant — and some wrap around it. When typing, ignore pronunciation entirely and type what you see, left to right. Five vowels are written in front of their consonant: เ แ โ ใ ไ. Each one gets typed before the consonant it belongs to, even though the consonant is pronounced first.
Rule 2: Stacked marks go right after their consonant
Anything that renders above or below a consonant — vowel marks like ื(eu), tone marks like ่(mái èek) — is typed immediately after that consonant, and the software stacks it in place. When a syllable has both, the order is: consonant, then the above or below vowel, then the tone mark.
Vowels that follow the consonant on the line come after all of that. That is why ำ is typed after the tone mark: it sits to the right of the consonant, so in น้ำ you type น, then ้, then ำ.
Typing order: three worked examples
| Word | Meaning | Keystroke order |
|---|---|---|
| ไม่ (mâi) | no, not | ไ → ม → ่ |
| น้ำ (náam) | water | น → ้ → ำ |
| เที่ยว (thîao) | to go out, travel | เ → ท → ี → ่ → ย → ว |
Look at เที่ยว(thîao) closely — it’s the whole system in one word. The leading vowel เ comes first because it’s leftmost. Then ท, the consonant. Then ี, the vowel that stacks above ท. Then ่, the tone mark that stacks above that. Then ย and ว finish the syllable. Six keystrokes, one strict order.
If a mark shows up on a dotted circle (◌) or sits in the wrong place, you typed it out of order — usually a mark before its consonant, or a tone mark before the vowel under it. Delete back to the consonant and retype. Mark order is one of the common Thai writing mistakes that carries straight over from handwriting to the keyboard.
Rule 3: The spacebar isn’t for words
Thai writes words with no spaces between them: ฉันชอบกินข้าวผัด(chǎn châwp gin khâao phàt). The spacebar separates phrases, clauses, and sentences — roughly where English would put a comma or a period. Typing a space mid-phrase marks you as a learner instantly, and it can genuinely confuse readers, since Thais use word boundaries they hold in their heads, not on the page.
Kedmanee vs. Pattachote: Which Layout Should You Learn?
Windows and macOS both offer a second Thai layout, so here’s the short version. Pattachote (ปัตตะโชติ(bpàt-dtà-chôot)) was designed by Sarit Pattachote after his research showed Kedmanee overworks the right hand — particularly the right little finger. It rebalances the load between hands, much like Dvorak does for English, and it is reported to be faster to type on.
Learn Kedmanee anyway. It’s the national standard, it’s what virtually every office, school, and dual-printed keyboard in Thailand uses, and the speed difference only matters at professional-typist volumes. Pattachote is a curiosity unless you’re planning a career in Thai data entry.
Don’t Want to Install Anything?
If you just need to type a Thai word occasionally — pasting into a dictionary, searching for a song — an online virtual keyboard does the job with zero setup. Sites like Branah and Lexilogos put a clickable Thai keyboard in your browser; you click out the Thai characters and copy the result. Handy for one-offs, hopeless for conversation speed.
Skip the converters that let you type “sawatdee” in English letters and turn it into Thai. Thai has no standard romanization-based input method the way Chinese has pinyin — Thais type the script directly — and a converter keeps you anchored to romanization at exactly the point where you’re trying to leave it behind.
Voice typing is the other no-layout route. On iPhone, switch to the Thai keyboard and tap the microphone to dictate in Thai. On Windows 11, press Win + H with Thai as the active language. Gboard has a microphone key too, though Google notes voice typing isn’t available in every language, so test it on your phone. Dictation is good for getting a message sent; it won’t teach you to spell.
And if you’re on a physical English-only keyboard long-term, you have three options, in ascending order of seriousness: hunt-and-peck with the on-screen layout viewer described above, buy Thai keyboard stickers for a few dollars, or — the actual answer — learn to touch-type Kedmanee so the printed labels stop mattering. Thai typists on dual-printed keyboards don’t look down either.
How to Actually Get Fast
The setup takes a minute; the fluency takes deliberate reps. What works:
- Switch one habit to Thai script. Text a Thai friend on LINE in Thai instead of English, even badly. Real conversation is the highest-motivation typing drill that exists.
- Search in Thai. Type ร้านกาแฟ(ráan gaa-fae) into Google Maps instead of “coffee shop” — you get a micro typing rep with a built-in reward.
- Copy short real sentences. Take a line from a menu, a sign, or a Thai reading exercise and retype it. Copying removes the recall load so you can focus purely on finger mechanics and stacking order.
- Let autocomplete teach you. When the phone’s suggestions don’t show the word you meant, your spelling is off — usually a tone mark or vowel length. That’s free, instant feedback most learners never got before smartphones.
A few focused sessions gets you to slow-but-correct. Daily texting gets you to conversational speed within weeks.
Frequently Asked Questions
How do I add a Thai keyboard on iPhone?
Go to Settings → General → Keyboard → Keyboards → Add New Keyboard, then select Thai. While typing, tap the globe key to switch between English and Thai, or hold it to choose from a list of your enabled keyboards.
How do I add a Thai keyboard on Android?
In Gboard, open the keyboard’s settings gear, tap Languages → Add keyboard, and choose Thai. To switch languages, touch and hold the space bar; a globe key appears only if you turn on Show language switch key in Gboard’s Preferences. On Samsung devices, add Thai in Samsung Keyboard’s language settings.
How do I type Thai on an English keyboard?
Enable Thai input in your OS — the physical keyboard doesn’t matter, since the system remaps every key to the Kedmanee layout. Until you’ve memorized the layout, show it on screen (On-Screen Keyboard on Windows, Keyboard Viewer on a Mac), or add Thai keyboard stickers to your keys. For a one-off word, an online virtual Thai keyboard you click with a mouse is quickest.
What does a Thai keyboard look like?
In Thailand, physical keyboards are dual-printed: each key shows an English letter plus one or two Thai characters (the second reached with shift). The arrangement is the Kedmanee layout, which descends from 1920s Thai typewriters. It isn’t phonetic, so the “D” key types ก, and the two most-used tone marks sit on the home row.
How do I switch my keyboard back to English?
On iPhone, tap the globe key. On Android with Gboard, touch and hold the space bar and pick English. On Windows, press Win + Space or use the taskbar language indicator. On Mac, press Control + Space or use the input menu in the menu bar; the globe/fn key works once it is set to Change Input Source in Keyboard settings.
One Minute of Settings, One New Skill
Enabling a Thai language keyboard costs you nothing and takes about a minute. What it buys you is the missing half of literacy: reading Thai lets you take language in, but typing in Thai lets you produce it — text a friend, search a map, look up a word you heard on the street. And because typing demands exact spelling recall, every message you send quietly strengthens the script knowledge underneath.
The prerequisite is the script itself — the keyboard shows you characters, and they need to mean something on sight. Jam Kham’s Read Thai course starts from zero: you read a real Thai word by the third card, and it teaches the consonant classes and tone rules behind every spelling. It’s free to start — start Read Thai free.
Related reading: Why Thai Spelling Is More Logical Than English | Thai Consonant Classes: Predict Any Tone | Common Thai Writing Mistakes (and How to Fix Each One) | How the Thai Writing System Works
See how Thai reading actually works
Sound out your first Thai word →No account, no card — just the alphabet.
Start reading Thai today
Start the reading course →First 3 modules free — no card, and they don't expire.